Serving-Machine-Learning-Models
Serving Machine Learning Models :robot:
About :boom:
This repository contains instructions, template source code and examples on how to serve/deploy machine learning models using various frameworks and applications such as Docker, Flask, FastAPI, BentoML, Streamlit, MLflow and even code on how to deploy your machine learning model as an android app.
The Repository also has code and how-to’s for deploying your apps to various cloud platforms(AWS, Heroku, Vercel etc), working with Github actions for CI/CD(Continuous Integration and Continuous Development), TDD(Test driven development) with pytest and other useful information.
Table of Contents :book:
- Serving Machine Learning Models :robot:
- About :boom:
- Repository Structure
- Getting Started⚡
- Building Machine Learning Model: Car Price Prediction⚡
- Creating Applications with your Model :computer:
- How to Test your models and applications with Pytest⚡
- Deploying your applications to AWS and Heroku⚡
- Github Actions⚡
- License
Repository Structure
├── androidapp
│   ├── buildozer.spec
│   ├── data
│   │   └── icon.png
│   ├── main.py
│   └── requirements.txt
├── bentoml
│   ├── bentofile.yaml
│   ├── bentosklearn.py
│   ├── Data
│   │   ├── cars.csv
│   │   ├── cars.zip
│   │   └── Data Dictionary - carprices.xlsx
│   ├── __init__.py
│   ├── requirements.txt
│   └── service.py
├── Data
│   ├── cars.csv
│   ├── cars.zip
│   └── Data Dictionary - carprices.xlsx
├── fastapi
│   ├── app.py
│   ├── Dockerfile
│   ├── fastapi-setup.sh
│   ├── favicon.png
│   ├── heroku.yml
│   ├── models
│   │   ├── model.pkl
│   │   └── sklearn_gbr.pkl
│   ├── models.py
│   ├── requirements.txt
│   ├── train.py
│   └── vercel.json
├── flaskapp
│   ├── app.py
│   ├── models
│   │   ├── model.pkl
│   │   └── sklearn_gbr.pkl
│   ├── Procfile
│   ├── requirements.txt
│   ├── runtime.txt
│   ├── static
│   │   ├── favicon.png
│   │   └── w3.css
│   ├── templates
│   │   ├── index.html
│   │   ├── result.html
│   │   ├── static
│   │   │   ├── favicon.png
│   │   │   └── w3.css
│   │   └── w3.css
│   └── utils.py
├── __init__.py
├── LICENSE.md
├── mlflow
│   ├── data
│   │   ├── cars.csv
│   │   ├── cars.zip
│   │   └── Data Dictionary - carprices.xlsx
│   ├── mlflow_app.py
│   ├── mlruns
│   │   └── 0
│   │       ├── 387be03e078049f69b2f68c916b1c4fa
│   │       │   ├── meta.yaml
│   │       │   └── tags
│   │       │       ├── mlflow.source.git.commit
│   │       │       ├── mlflow.source.name
│   │       │       ├── mlflow.source.type
│   │       │       └── mlflow.user
│   │       ├── 7813850eea9344c0a8e67670fd1eb52b
│   │       │   ├── artifacts
│   │       │   │   └── cars.csv
│   │       │   ├── meta.yaml
│   │       │   └── tags
│   │       │       ├── mlflow.source.git.commit
│   │       │       ├── mlflow.source.name
│   │       │       ├── mlflow.source.type
│   │       │       └── mlflow.user
│   │       ├── 8d81478e0b7a4ab78a76afb2c0225d85
│   │       │   ├── meta.yaml
│   │       │   └── tags
│   │       │       ├── mlflow.source.git.commit
│   │       │       ├── mlflow.source.name
│   │       │       ├── mlflow.source.type
│   │       │       └── mlflow.user
│   │       ├── d152c4ed8ff846459df57701db6542b0
│   │       │   ├── artifacts
│   │       │   │   └── cars.csv
│   │       │   ├── meta.yaml
│   │       │   ├── metrics
│   │       │   │   └── R2_Score
│   │       │   ├── params
│   │       │   │   └── gbr
│   │       │   └── tags
│   │       │       ├── mlflow.source.git.commit
│   │       │       ├── mlflow.source.name
│   │       │       ├── mlflow.source.type
│   │       │       └── mlflow.user
│   │       ├── ee11d66e35c64736bda4bd41429a678b
│   │       │   ├── artifacts
│   │       │   │   └── cars.csv
│   │       │   ├── meta.yaml
│   │       │   └── tags
│   │       │       ├── mlflow.source.git.commit
│   │       │       ├── mlflow.source.name
│   │       │       ├── mlflow.source.type
│   │       │       └── mlflow.user
│   │       ├── f6aeeb22a768414e81e1825e8b65c728
│   │       │   ├── artifacts
│   │       │   │   ├── cars.csv
│   │       │   │   └── model
│   │       │   │       ├── conda.yaml
│   │       │   │       ├── MLmodel
│   │       │   │       ├── model.pkl
│   │       │   │       ├── python_env.yaml
│   │       │   │       └── requirements.txt
│   │       │   ├── meta.yaml
│   │       │   ├── metrics
│   │       │   │   └── R2_Score
│   │       │   ├── params
│   │       │   │   └── gbr
│   │       │   └── tags
│   │       │       ├── mlflow.log-model.history
│   │       │       ├── mlflow.source.git.commit
│   │       │       ├── mlflow.source.name
│   │       │       ├── mlflow.source.type
│   │       │       └── mlflow.user
│   │       ├── meta.yaml
│   │       └── tags
│   │           └── mlflow.note.content
│   └── requirements.txt
├── Notebooks
│   └── Notebooks.zip
├── README.md
├── setup.sh
├── streamlitapp
│   └── streamlit_app.py
└── tests
└── test_api.py
Getting Started⚡
Before we get into building and deploying our models we’ll have to setup our environment. I use ‘pyenv’ for managing different versions of python and pyenv-virtualenv for setting up virtual environments. You can learn how to install pyenv on your operating system by checking out their official github. Also it’s important you have git installed on your system so you can easily clone this repository. If you’re on Linux you can install git by running this command:
sudo apt-get install git
Configuring Python Environment⚡
To easily setup our environment I’ve created a shell script named ‘setup.sh’ for easily installing and configuring pyenv on your system. It’s assumed we are working with Linux but there are ways to install pyenv on windows too. To install pyenv easily with the shell script run the following commands in your terminal:
- Clone this repository:
git clone https://github.com/Nneji123/Serving-Machine-Learning-Models.git
- Change the working directory
cd Serving-Machine-Learning-Models
- Run the script
./setup.sh
- After running the script you can check if pyenv successfully installed by running:
pyenv versions
And you should see Python 3.8.10 as the installed version.
Installing Dependencies and Creating virtual environments with pyenv
We will be working with python and some frameworks such as FastAPI, Flask, Streamlit etc and we will need to install their various dependencies. In each folder I’ve created specific requirements.txt files for installing the dependencies needed for each project. For example you can install the FastAPI application requirements with pip by running:
cd fastapi

pip install -r requirement.txt
Same goes for the other projects in this repository as well.
Building Machine Learning Model: Car Price Prediction⚡
In this project we will be building a machine learning regression model that can predict the price of a car based on some features. The dataset used can be found on Kaggle and can also be found in this repository. You can check out the notebooks folder which contains the notebook used for analysing and visualising the data and building our model.
How to save Models with Joblib⚡
Joblib is a set of tools to provide lightweight pipelining in Python. You can read more about Joblib here. To save our model I used joblib to save the model as a pickle file(.pkl) so we can later use the model to make predictions. To save your models(assuming you’ve built a model) you can do that by running:
import joblib
model = LinearRegression
model.fit(X_train, y_train)
joblib.dump('model.pkl', model)
Version Control your models with DVC(Data Version Control)
What is DVC for? Data Version Control, or DVC, is a data and ML experiment management tool that takes advantage of the existing engineering toolset that we are familiar with (Git, CI/CD, etc.). DVC is meant to be run alongside Git. The git and DVC commands will often be used in tandem, one after the other. In this project I used DVC to manage our models and data. You can read more about DVC and how to use it here.
Creating Applications with your Model :computer
In this section we will be serving our models as applications using these frameworks:
- FastAPI
- Flask
- BentoML
- Mlflow
- Streamlit
- KivyMD
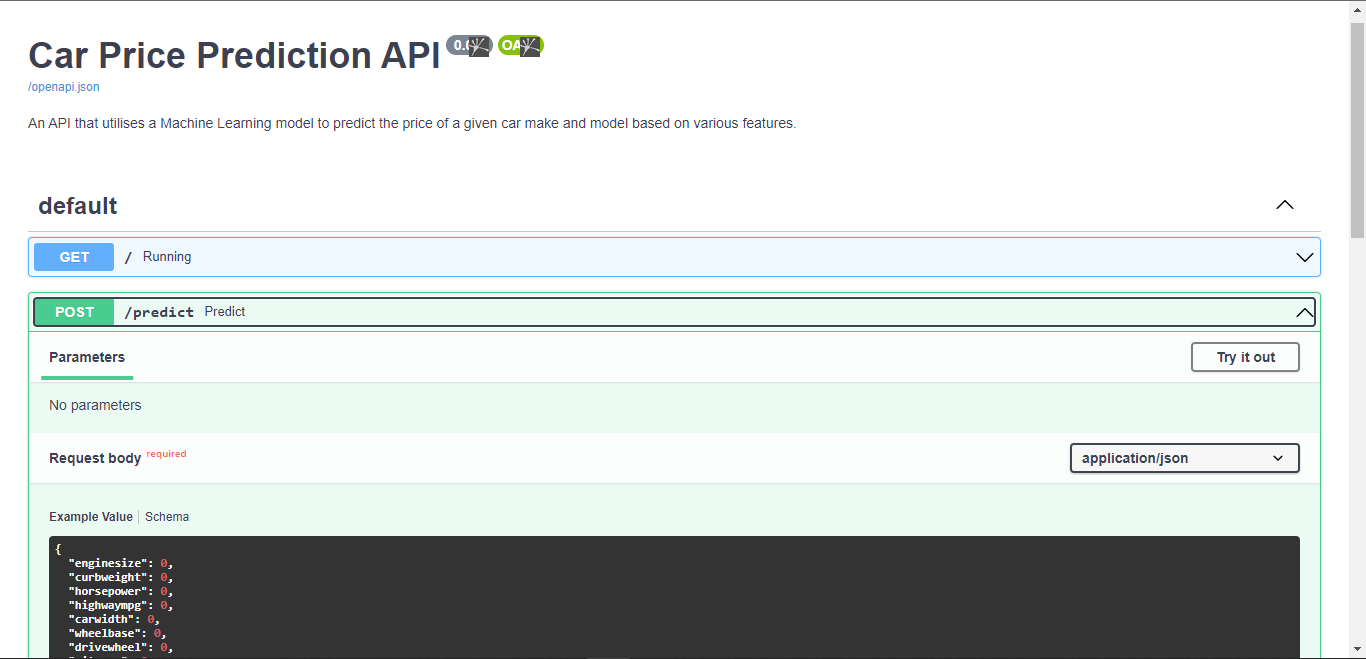
Serving Models with FastAPI⚡
FastAPI is a modern, fast (high-performance), web framework for building APIs with Python 3.6+ based on standard Python type hints.
The key features are:
-
Fast: Very high performance, on par with NodeJS and Go (thanks to Starlette and Pydantic). One of the - fastest Python frameworks available.
-
Fast to code: Increase the speed to develop features by about 200% to 300%. *
- Fewer bugs: Reduce about 40% of human (developer) induced errors. *
- Intuitive: Great editor support. Completion everywhere. Less time debugging.
- Easy: Designed to be easy to use and learn. Less time reading docs.
- Short: Minimize code duplication. Multiple features from each parameter declaration. Fewer bugs.
- Robust: Get production-ready code. With automatic interactive documentation.
- Standards-based: Based on (and fully compatible with) the open standards for APIs: OpenAPI (previously known as Swagger) and JSON Schema.
To serve models with FastAPI I’ve created an example template in this repository in which I deployed the car price prediction model as an API which can be used to make POST requests to get predictions. To run that project locally on your system run the following:
cd fastapi
pip install -r requirement.txt
uvicorn app:app --reload
You should be able to view the API on your browser by visiting http://127.0.0.1:8000/
You can also view the deployed API here https://carpriceapi.herokuapp.com
In this tutorial you can learn more about how to serve your model as a RESTful API with FastAPI.
Screenshot :camera:
You can also check out other FastAPI applications on my GitHub
Serving Models with Flask⚡
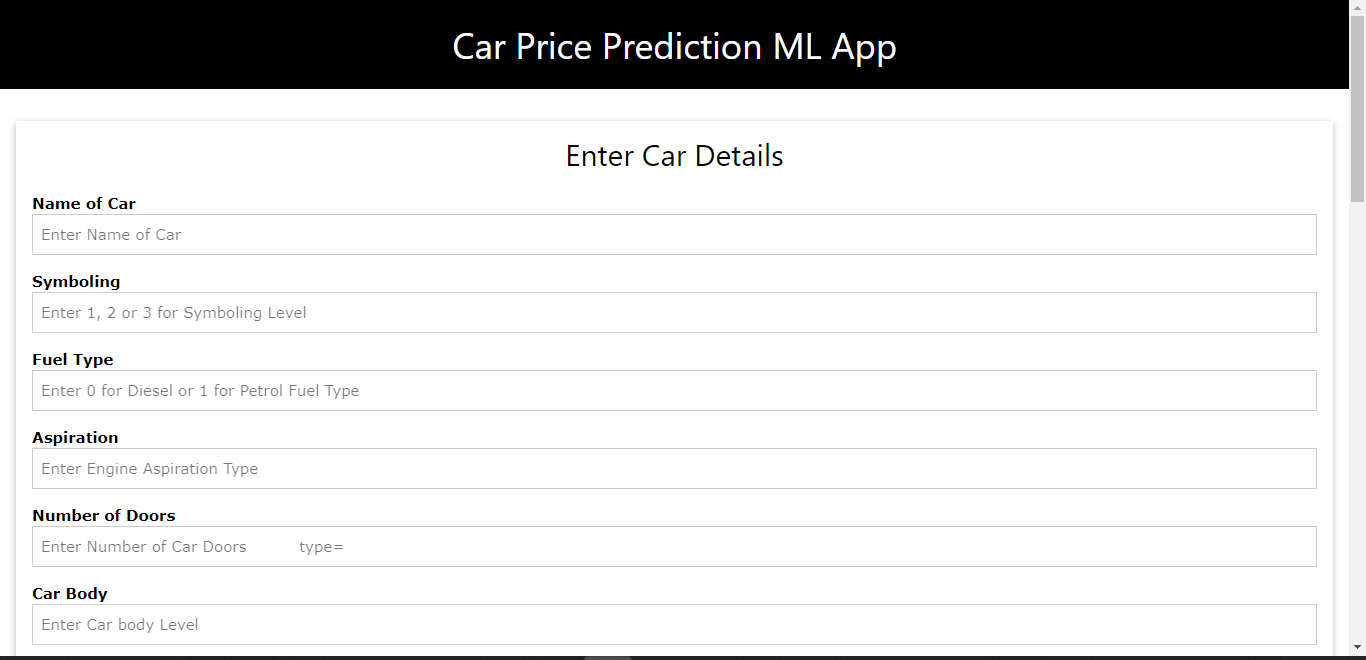
Flask is a micro web framework written in Python. It is classified as a microframework because it does not require particular tools or libraries. It has no database abstraction layer, form validation, or any other components where pre-existing third-party libraries provide common functions. However, Flask supports extensions that can add application features as if they were implemented in Flask itself. Extensions exist for object-relational mappers, form validation, upload handling, various open authentication technologies and several common framework related tools.
To serve models with flask I’ve created a template in this repository in which I deployed the car price prediction model as a web app with basic html and css. To run that project locally on your system run the following:
cd flaskapp
pip install -r requirements.txt
python app.py
You should be able to view the application on your browser by visiting http://127.0.0.1:5000/
You can also view the deployed application here: https://carflaskpred.herokuapp.com
Screenshot :camera:
Serving Models with BentoML⚡
BentoML is a Python open-source library that enables users to create a machine learning-powered prediction service in minutes, which helps to bridge the gap between data science and DevOps.
To serve models with Bentoml I’ve created a template in this repository in which I deployed the car price prediction model as an API with Bentoml. To run that project locally on your system run the following:
cd bentoml
pip install -r requirements.txt
python bentosklearn.py
bentoml serve service.py:service --reload
You should be able to view the application on your browser by visiting http://127.0.0.1:5000/
Serving Models with Mlflow⚡
MLflow is a platform to streamline machine learning development, including tracking experiments, packaging code into reproducible runs, and sharing and deploying models. MLflow offers a set of lightweight APIs that can be used with any existing machine learning application or library (TensorFlow, PyTorch, XGBoost, etc), wherever you currently run ML code (e.g. in notebooks, standalone applications or the cloud).
To serve models with mlflow I’ve created a template in this repository in which I deployed the car price prediction model as an API with mlflow. To run that project locally on your system run the following:
cd mlflow
pip install -r requirements.txt
python mlflow_app.py
Then you can run this command below to view the Mlflow User Interface:
mlflow ui
Serving Models with Streamlit⚡
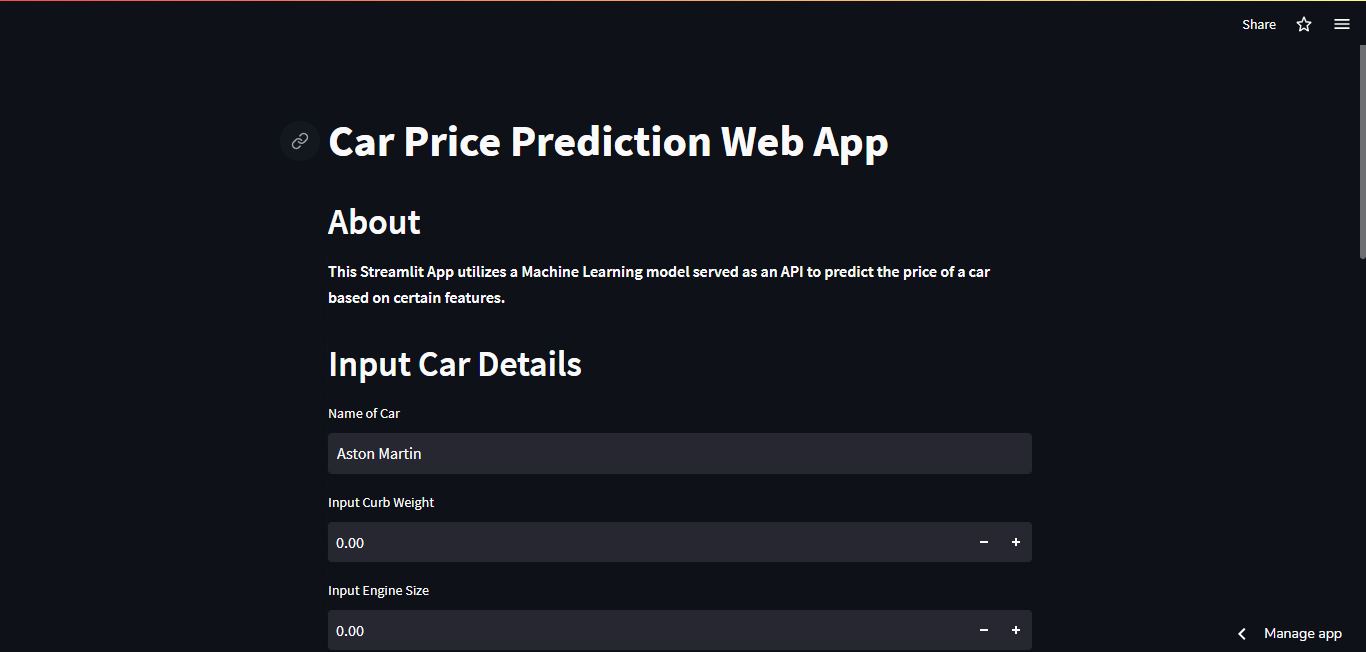
Streamlit is an open source app framework in Python language. It helps us create web apps for data science and machine learning in a short time. It is compatible with major Python libraries such as scikit-learn, Keras, PyTorch, SymPy(latex), NumPy, pandas, Matplotlib etc.
To serve models with Streamlit I’ve created a template in this repository in which I deployed the car price prediction model as a web app with streamlit. To run that project locally on your system run the following:
cd streamlitapp
pip install -r requirements.txt
streamlit run streamlit_app.py
You should be able to view the web application in your browser with this link http://127.0.0.1:8501/
You can also check out the streamlit application deployed on streamlit cloud here
Screenshot :camera:
You can also check out my other Streamlit Projects with this link
Serving Models as Desktop/Mobile Applications⚡
You can also deploy machine learning models as desktop and mobile applications with frameworks such as KivyMD. You can learn more about deploying models with KivyMD by checking out this tutorial.
I’ve also created a template application in this repository for deploying the car price prediction model with KivyMD. I also built the applications as an android app with buildozer and github actions which will be explained in later sections. You can check out and install the android applications by checking out the bin folder in the data branch of this repository.
To run that project, run the following commands:
cd androidapp
pip install -r requirements.txt
python main.py
You should see a screen similar to the image below:

How to Test your models and applications with Pytest⚡
The pytest framework makes it easy to write small, readable tests, and can scale to support complex functional testing for applications and libraries.
Working with Docker⚡
Docker is a set of platform as a service products that use OS-level virtualization to deliver software in packages called containers. The service has both free and premium tiers.
In this repository I’ve deployed the FastAPI application using a Dockerfile. You can learn more about working with Docker and writing Dockerfiles here
Deploying your applications to AWS and Heroku⚡
In this repository I’ve deployed the FastAPI and Flask applications to platforms such as AWS and Heroku. I’ll be using the fastapi folder as an example of deploying applications to both AWS and Heroku.
Deploy to Heroku⚡
To deploy the FastAPI application to Heroku run the following commands:
- Install the heroku cli
npm install -g heroku
- Login to Heroku
heroku login --interactive
- Change the working directory
cd fastapi
- Run this command so as to work with just the fastapi folder
git init
git add .
git commit -m "first commit"
- Create the heroku app
heroku create your-app-name
Replace your-app-name with the name of your choosing.
- Set the heroku cli git remote to that app
heroku git:remote your-app-name
- Set the heroku stack setting to container
heroku stack:set container
- Push to heroku
git push heroku master
And you should be able to view your deployed application by following the link e.g https://your-app-name.herokuapp.com
You can also view logs for your deployed application by running:
heroku logs -t -a your-app-name
Deploy to AWS⚡
You can also deploy your application using an AWS EC2 instance(Ubuntu) by following the steps below. This is also assuming you have launched your instance, exposed the required ports and installed git in your instance. If you don’t know how to do that you can check out this repository for more details.
Run the following commands in your AWS EC2 instance:
git clone https://github.com/Nneji123/Serving-Machine-Learning-Models.git
cd Serving-Machine-Learning-Models/fastapi
./fastapi-setup.sh
After running the commands above you can view your deployed application by going to the Public IP address location of your AWS instance. E.g if your public ip address is 3.91.202.12 visit http://3.91.202.12:80/docs to view your deployed API documentation.
Github Actions⚡
GitHub Actions makes it easy to automate all your software workflows, now with world-class CI/CD. Build, test, and deploy your code right from GitHub. Make code reviews, branch management, and issue triaging work the way you want.
Using Github Actions and Heroku for CI/CD⚡
In this repository I’ve used Github actions to continuously deploy the Flask and FastAPI applications to Heroku i.e whenever I make a push or pull action in this repository the Github action will run and deploy new versions of those applications to Heroku. The ‘action’ files are stored in this folder
You can read more about using Github actions to automate your workflow here